

















What Makes Roasted Chicken Leg & Veggie Power Plate Special
The Roasted Chicken Leg & Veggie Power Plate draws inspiration from traditional family meals, showcasing the comforting flavors and aromas that come from roasting. The blend of savory chicken, earthy vegetables, and the crispiness of roasted potatoes creates a satisfying dish that’s both nourishing and delightful. The fragrant spices—like garlic and paprika—infuse the chicken, while the colorful vegetables add a feast for the eyes as well as a variety of textures. Home cooks love this dish for its simple preparation and the way it brings everyone to the dinner table. With the warm scent of roasted goodness wafting through the kitchen, it’s a meal that promises to bring smiles to all who gather. You may also find Crispy Herb Roasted Chicken Plate useful.
Why This Recipe Works
- Quick prep time
- Uses pantry-friendly ingredients
- Budget-conscious
- Beginner-friendly
- Family-tested and approved
This particular easy Roasted Chicken Leg & Veggie Power Plate stands out because it combines straightforward steps with rich flavors. Unlike many other versions online, this recipe ensures that each ingredient shines, allowing the chicken to be juicy and flavorful while the veggies remain vibrant and tender. Thus, it’s not just a meal; it’s a dish that enhances family bonding over shared tables. You may also find Golden Chicken Veggie Plate useful.
How to Make Roasted Chicken Leg & Veggie Power Plate
Making an easy Roasted Chicken Leg & Veggie Power Plate is straightforward. First, rub the chicken with olive oil and spices to maximize flavor. Next, roast the potatoes until golden, which adds a crispy texture. Then, steam or roast the vegetables until they’re tender, keeping their bright colors. Don’t forget to boil the eggs, as their creaminess complements the other ingredients. This method not only ensures all components are ready at the same time but also highlights the importance of getting those flavor nuances as you learn how to make Roasted Chicken Leg & Veggie Power Plate from scratch. You may also find Breakfast Creamy Power Plate useful.
Ingredients
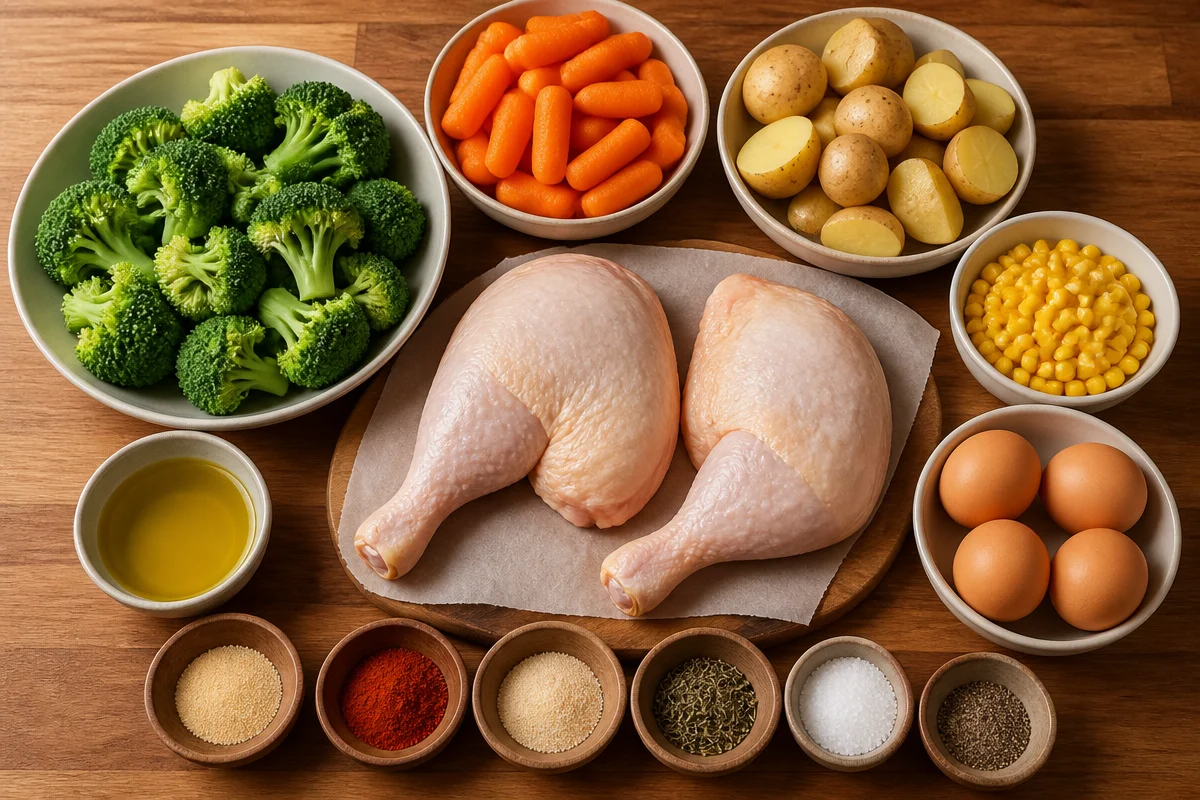
- 2 large roasted chicken leg quarters
- 1 lb baby potatoes, halved
- 2 cups broccoli florets
- 1 1/2 cups baby carrots
- 1 cup corn kernels
- 4 large eggs
- 2 tbsp olive oil
- 1 tsp garlic powder
- 1 tsp paprika
- 1 tsp onion powder
- 1/2 tsp dried thyme
- Salt and black pepper, to taste
When selecting your ingredients, opt for organic chicken for the best taste and quality. Choose firm baby potatoes and vibrant, fresh veggies for maximum flavor and nutrients. For dietary substitutes, you can use sweet potatoes in place of regular potatoes for a healthier option, or if you’re looking for a vegan choice, consider marinated tofu instead of chicken.
Step-by-Step Directions
-
Preheat your oven to 400°F (200°C). This ensures the chicken and potatoes roast evenly, resulting in crispy skin and tender meat. Avoid skipping this step; it’s crucial for the perfect roast.
-
In a bowl, rub the chicken leg quarters with olive oil, garlic powder, paprika, onion powder, thyme, salt, and pepper. This flavorful mixture is essential for achieving that mouthwatering taste as it caramelizes during roasting. A common mistake is not marinating the chicken long enough; aim for at least 15 minutes if you can.
-
Toss the halved baby potatoes in olive oil, salt, and pepper until they’re evenly coated. Roast them for about 30–35 minutes until they’re golden brown and crispy. Keep an eye out for that golden color—overcooking can lead to dryness.
-
While the potatoes are roasting, prepare the vegetables. Steam or roast the broccoli, carrots, and corn until tender. You’ll want them to retain their bright colors and crunch; overcooking can dull their vibrancy.
-
Boil the eggs for 8–9 minutes, then cool, peel, and slice them in half. A gently simmering pot of water will deliver the perfectly cooked eggs, avoiding the rubbery texture that comes from overcooking.
-
Once everything is ready, arrange the roasted chicken, crispy potatoes, vibrant veggies, and halved eggs on a large serving plate. This colorful display is inviting and ensures everyone gets a bit of each element, making for a balanced bite!
How to Serve Roasted Chicken Leg & Veggie Power Plate
For a complete meal, pair your dish with a refreshing side salad or some crusty bread. A glass of chilled white wine would complement the savory flavors beautifully. When serving, consider arranging the chicken in the center of the plate with the colorful veggies around it to create an appealing presentation. This dish is perfect for a weeknight dinner or a cozy family gathering.
Storage and Reheating
Your Roasted Chicken Leg & Veggie Power Plate will keep well in the fridge for up to 3 days. Store it in an airtight container to maintain freshness. If you plan to freeze leftovers, they can be stored for up to 3 months. Thaw in the refrigerator overnight before reheating. To preserve the original texture and flavor, reheat in the oven at 350°F (175°C) for about 15-20 minutes or until warmed through. Meal prep tip: consider preparing extra chicken to use in salads or wraps throughout the week.
Pro Tips
- Layer Flavors: For an elevated flavor profile, marinate the chicken overnight with spices and olive oil. This allows the seasonings to penetrate deeply into the meat.
- Texture Improvement: For crispier potatoes, parboil them before roasting. This step helps achieve that soft inside and crunchy exterior, preventing the dreaded soggy potato experience.
- Optimize Cooking Time: When cooking for larger groups, ensure the chicken quarters have enough space on the baking sheet. Overcrowding can lead to uneven cooking.
- Ingredient Upgrades: Try using smoked paprika instead of regular paprika for an unexpected depth of flavor that will wow your family at the dinner table.
- Time-Saving Shortcut: Use pre-cut veggies to cut down prep time significantly; this makes your simple Roasted Chicken Leg & Veggie Power Plate recipe even quicker to prepare.
Variations
Spicy Version
Add red pepper flakes to the spice mix or serve the dish with a spicy aioli for those who like a bit of heat. This variation adds a thrilling kick that can enhance the overall flavor profile.
Lighter and Healthier Version
Swap out the baby potatoes for zucchini slices or use cauliflower for a lower-carb alternative that retains a satisfying texture while reducing calories.
Vegetarian or Vegan Version
Replace the chicken with marinated tempeh or grilled portobello mushrooms. For the eggs, consider adding silken tofu if you’re aiming for a vegan adaptation that mimics egg texture.
Frequently Asked Questions
Q: Can I make it ahead of time?
A: Yes, you can prepare all components the day before and reheat them before serving. This makes it a convenient option for busy weeknights.
Q: How do I fix a texture or consistency problem?
A: If the chicken turns out dry, try adding a bit of chicken broth when reheating, which can help rehydrate the meat. For soggy potatoes, tossing them in the oven for a few minutes can restore their crispiness.
Q: What’s the best ingredient substitution?
A: For gluten-free diets, ensure your spices are gluten-free. Additionally, you could substitute the corn with peas or another vegetable of your choice.
Q: How long does it keep?
A: This dish can last in the refrigerator for up to 3 days when stored properly in an airtight container.
Q: How do I adjust cooking time for a larger or smaller batch?
A: For larger batches, roast in batches to prevent overcrowding. Smaller portions may cook faster, so check for doneness around 5 minutes earlier than the suggested cooking time.
Q: What’s a common beginner question specific to this dish?
A: A common question is how to know when the chicken is done. You can check its internal temperature; it should reach 165°F (74°C) to be safely cooked.
Conclusion
Cooking your own Roasted Chicken Leg & Veggie Power Plate allows you to control the flavors, textures, and ingredients, creating something truly special for your family. This dish not only nourishes the body but also promotes togetherness around the dinner table. Looking for more inspiration? Check out these Easy Shawarma Hummus Bowls or dive into some delicious Oven Roasted Chicken Thighs for your next culinary adventure!
Roasted Chicken Leg & Veggie Power Plate
Ingredients
Method
- Preheat your oven to 400°F (200°C).
- Rub the chicken leg quarters with olive oil, garlic powder, paprika, onion powder, thyme, salt, and pepper. Marinate for at least 15 minutes.
- Toss the halved baby potatoes in olive oil, salt, and pepper until evenly coated.
- Roast the potatoes for about 30–35 minutes until golden brown and crispy.
- While the potatoes are roasting, prepare the vegetables by steaming or roasting the broccoli, carrots, and corn until tender.
- Boil the eggs for 8–9 minutes, then cool, peel, and slice them in half.
- Once everything is cooked, arrange the roasted chicken, crispy potatoes, vibrant veggies, and halved eggs on a large serving plate.