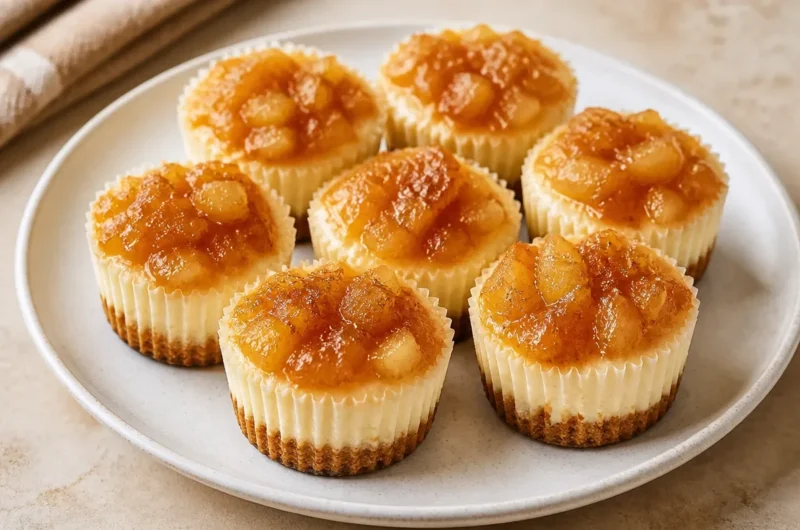





Mini Pineapple Upside Down Cheesecakes: A Delicious Twist
The aroma of caramelizing brown sugar and sizzling butter filled the kitchen as I prepared my first batch of mini pineapple upside down cheesecakes. The sound of the butter bubbling and the sizzling pineapple pieces brought back warm memories of family gatherings, where dessert was always the highlight. Each bite of that creamy, rich cheesecake topped with a sweet, tangy pineapple promised comfort and joy, making it impossible to resist the final product. You may also find Creamy Mini Pineapple Upside Down Cheesecake Bites useful.
These delightful treats combine the classic flavors of a traditional pineapple upside-down cake with the luscious texture of cheesecake, delivering a dessert that will impress your family and friends. Whether you’re entertaining guests or simply craving a sweet indulgence, mini pineapple upside down cheesecakes are a perfect choice. You may also find Delight In Pineapple Upside Down Sugar Cookies Youll Love useful.
Why You’ll Love This Recipe
- Each cheesecake is topped with caramelized pineapple, creating an irresistible flavor contrast.
- The individual portions are perfect for sharing or just indulging on your own.
- The recipe is adaptable, allowing you to switch up ingredients based on your preferences.
- They can be made in advance and stored for a perfect ready-to-go treat.
- The balance of creamy cheese filling with the sweet, tart fruit makes every bite a taste sensation.
Ingredients You’ll Need
-
For the crust: You may also find Pineapple Upside Down Sugar Cookies useful.
- 1 cup graham cracker crumbs (adds a crunchy texture)
- 1/4 cup sugar (sweetens and enhances the flavor)
- 1/2 cup unsalted butter, melted (binds the crust together)
-
For the cheesecake filling:
- 16 oz cream cheese, softened (provides creaminess and richness)
- 1/2 cup sugar (balances the tartness of the pineapple)
- 2 large eggs (gives structure and stability)
- 1 tsp vanilla extract (adds depth of flavor)
-
For the topping:
- 1 cup fresh pineapple, diced (freshness enhances the overall taste)
- 1/4 cup brown sugar (for caramelizing the pineapple)
- 2 tbsp unsalted butter (adds richness to the topping)
How to Make Mini Pineapple Upside Down Cheesecakes
-
Prepare the crust: Preheat your oven to 350°F (175°C). In a bowl, combine the graham cracker crumbs, sugar, and melted butter until evenly mixed. Press the mixture firmly into the bottom of a muffin tin lined with cupcake liners to create a crust.
-
Prepare the topping: In a small skillet, melt 2 tablespoons of butter over medium heat. Add the diced pineapple and brown sugar. Stir until the sugar dissolves and the pineapple is slightly caramelized, about 5-7 minutes. Set aside to cool.
-
Make the cheesecake filling: In a large mixing bowl, beat the softened cream cheese and sugar until smooth. Add the eggs one at a time, mixing well after each addition. Stir in the vanilla extract.
-
Assemble the cheesecakes: Spoon a tablespoon of the caramelized pineapple mixture into each crust, followed by the cheesecake filling, filling each cup almost to the top.
-
Bake: Place the muffin tin in the preheated oven and bake for about 18-20 minutes or until the centers are set and slightly puffed. The edges should be lightly golden.
-
Cool and chill: Remove the cheesecakes from the oven and let them cool in the tin for about 10 minutes before transferring them to a wire rack to cool completely. Once cooled, refrigerate for at least 2 hours before serving.
-
Serve: Garnish with additional caramelized pineapple or whipped cream if desired. Enjoy this delightful twist on a classic dessert!
Tips for the Best Results
- For a gluten-free version, use gluten-free graham cracker crumbs for the crust.
- Ensure your cream cheese is at room temperature for a smooth cheesecake filling; cold cream cheese can lead to lumps.
- To prevent cracks on the surface, avoid overmixing the cheesecake batter once you’ve added the eggs.
Common Mistakes to Avoid
- Overbaking the cheesecakes: Keep an eye on them as they cook. They’ll continue to set as they cool, so it’s better to remove them while they’re still slightly jiggly in the center.
- Not chilling enough: Allowing the cheesecakes to chill for a few hours enhances their texture and flavor. Don’t rush this step!
- Skipping the lining of the muffin tin: Use cupcake liners to ensure easy release of the cheesecakes without damaging them.
Variations
- Substitute different fruits: While pineapple is classic, you can try peaches or cherries for a different flavor.
- Add coconut: Incorporate shredded coconut into the crust or topping for an added tropical flavor.
- Spice it up: Consider adding a pinch of cinnamon or nutmeg to the cheesecake filling for a hint of warmth.
Storage and Reheating
Store the mini cheesecakes in an airtight container in the refrigerator for up to 5 days. They can also be frozen for up to 2 months. To reheat, let them thaw in the refrigerator overnight before serving. They taste great chilled, so reheating isn’t necessary!
Frequently Asked Questions
Can I use frozen pineapple? Yes, you can use frozen pineapple; just make sure to drain excess moisture before using it.
Why did mine turn out dry? Overbaking is often the culprit. Monitor your cheesecakes closely towards the end of the baking time.
Can I make these ahead of time? Absolutely! They keep well in the fridge, making them a great make-ahead dessert.
Final Thoughts
As I bit into one of these mini pineapple upside down cheesecakes, the sweet, tangy flavor of caramelized pineapple and smooth creaminess enveloped my senses, making me nostalgic for family gatherings centered around dessert. These individual treats not only satisfy a sweet tooth but also bring a playful twist to a timeless classic, making any occasion special.
Conclusion
These mini pineapple upside down cheesecakes are a delicious and elegant treat that can easily be made ahead of time. They not only deliver on flavor but also allow for creativity in the kitchen. For more ideas, check out these gluten-free mini cheesecakes and explore mini pineapple upside-down cakes for further culinary inspiration. Enjoy your baking!